How to Resize Photo & Signature for Online Exam Forms (Size + KB Guide)
You've filled in every field of the application, you reach the upload step, and the form spits back an error: “Photo must be between 20 KB and 50 KB” or “Signature dimensions invalid.” It's one of the most common reasons online exam and job applications get stuck — and almost always, the fix takes under two minutes once you know what the form is actually asking for.
This guide explains the two things every exam form checks, the exact free workflow to fix both, and a handy centimetre-to-pixel converter so you never guess the size again. Everything here is done in your browser — your photo and signature never leave your device.
Why exam forms reject your photo or signature
Most rejections come down to three mismatches:
Wrong dimensions — the form wants a specific width and height (in pixels or centimetres), and your image doesn't match.
File too large or too small — the form sets a KB range (e.g. photo 20–50 KB, signature 10–20 KB) and your file falls outside it.
Wrong format — most government and exam portals accept only JPG/JPEG.
Fixing all three is a three-step job: get the framing right, set the exact dimensions, then bring the file size into range. Here's how.
The two numbers every form gives you
Before you touch any tool, read your form's instructions and note two separate things — people constantly confuse them:
Dimensions — the size in pixels (like 200 × 230 px) or centimetres (like 3.5 × 4.5 cm). This controls how the image is shaped.
File size — the limit in kilobytes (like “under 50 KB”). This controls how heavy the file is.
These are independent. A photo can be the perfect 200 × 230 px and still be 400 KB — too heavy. So you set the dimensions first, then reduce the file size separately. Trying to do both with one slider is exactly why most people get stuck.
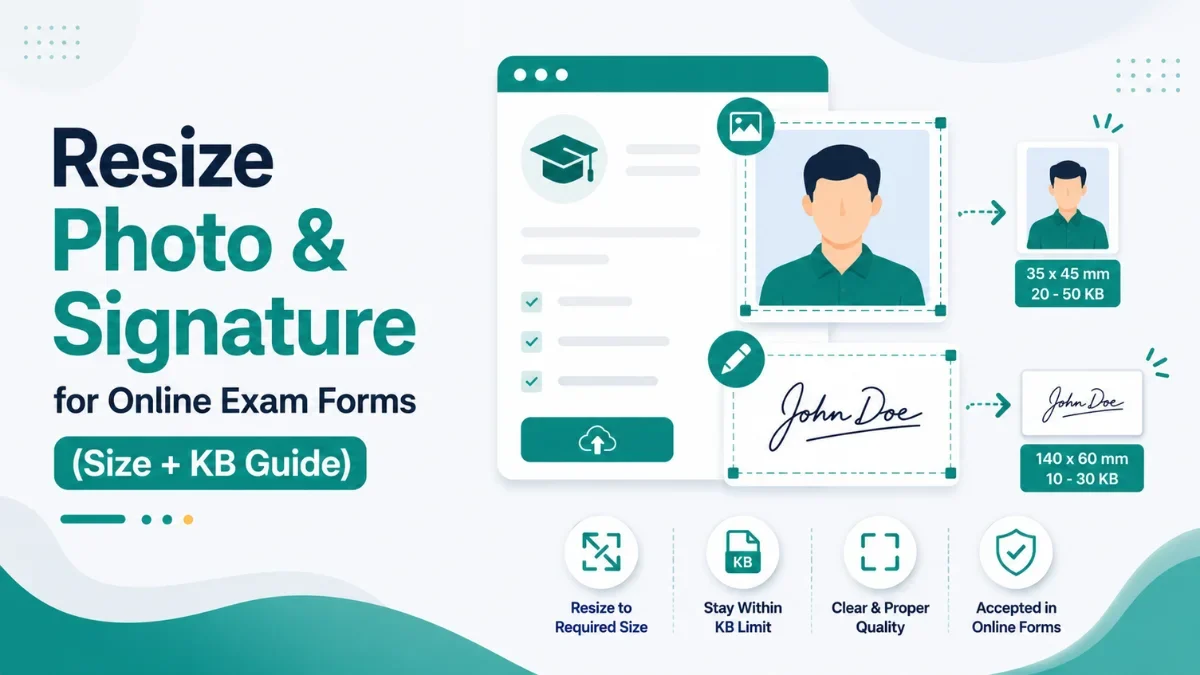
Commonly required photo & signature sizes
Requirements vary by exam and change with each notification, so always check your specific form's instructions first. That said, these are the values most Indian exam and recruitment portals (SSC, UPSC, banking, railways, university admissions) tend to ask for, as a rough guide:
Item | Typical dimensions | Typical file size | Format |
|---|---|---|---|
Photograph | 200 × 230 px (≈ 3.5 × 4.5 cm) | 20 KB – 50 KB (up to 100 KB) | JPG / JPEG |
Signature | 140 × 60 px (≈ 3.5 × 1.5 cm) | 10 KB – 20 KB | JPG / JPEG |
Thumb impression | 240 × 240 px | 20 KB – 50 KB | JPG / JPEG |
Treat these as a starting point, not gospel — your form's stated numbers always win.
Centimetres to pixels: the quick converter
Many forms give the size in centimetres while the tools work in pixels. To convert, use:
pixels = centimetres ÷ 2.54 × DPI
Most scanned/printed photo requirements assume 300 DPI. At 300 DPI:
Centimetres | Pixels (at 300 DPI) |
|---|---|
3.5 × 4.5 cm (photo) | ≈ 413 × 531 px |
3.5 × 1.5 cm (signature) | ≈ 413 × 177 px |
2.5 × 3.5 cm | ≈ 295 × 413 px |
If your form lists pixel values directly, just use those — no maths needed. If it only gives centimetres, convert with the formula above and enter the pixel result in the resizer.
Step 1 - Frame your photo correctly (optional, but recommended)
If your photo has too much background or isn't centred on your face, start by cropping it. Open the Image Cropper, upload your photo, and drag the crop handles so your face fills most of the frame with a little space above the head — the standard look for ID photos. Choose Free crop for full control, then download.
This step is about composition, not exact size — you'll set the precise dimensions next. Skip it if your photo is already well-framed.
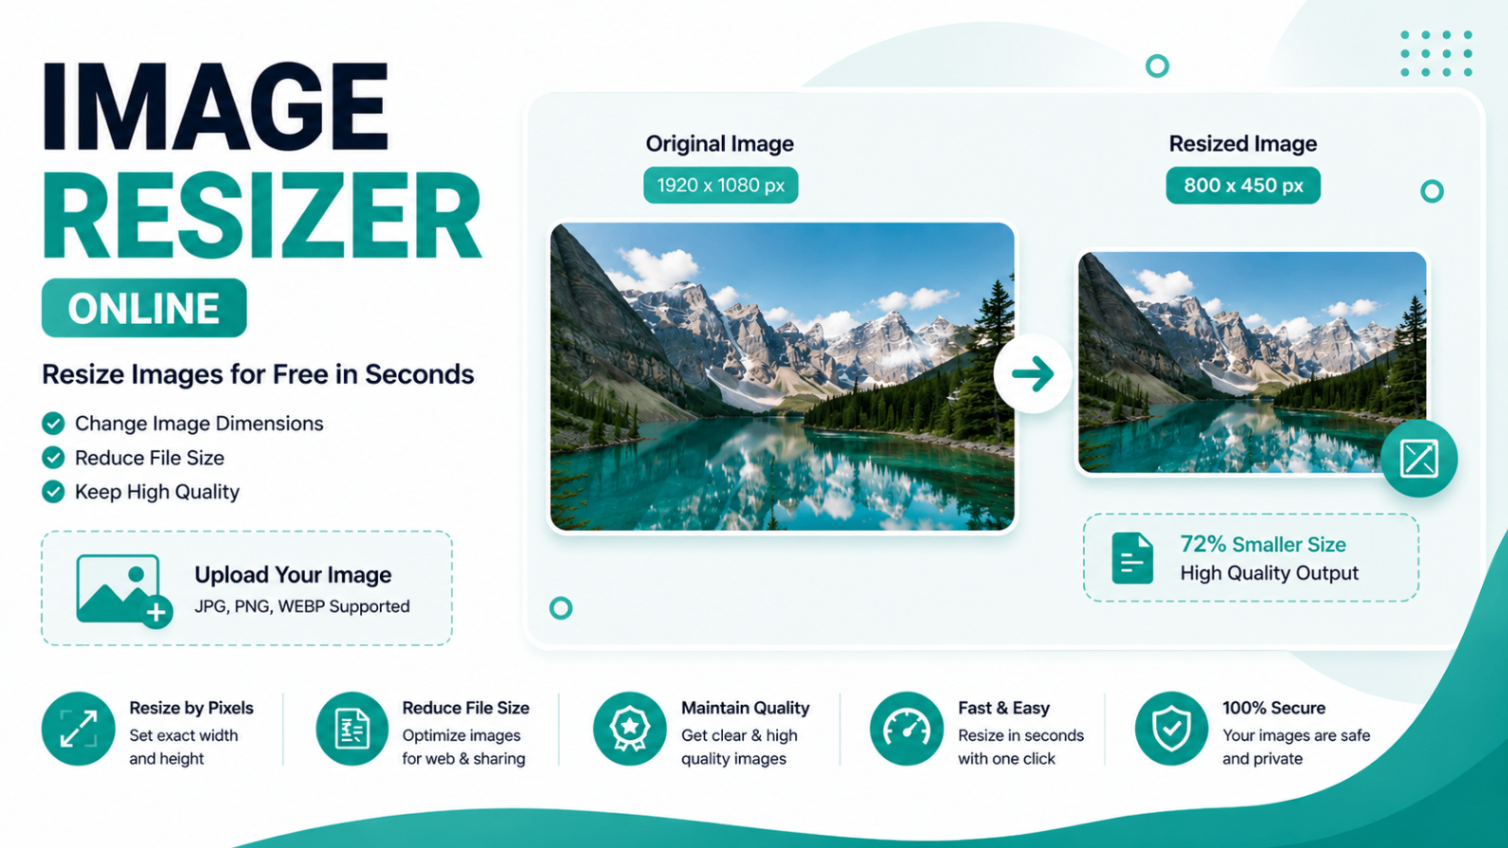
Step 2 - Resize to the exact pixel dimensions
This is the key step for passing the form's dimension check. Open the Image Resizer and:
Upload your photo (or signature).
Enter the exact width and height in pixels your form requires — for example 200 and 230 for a photo.
For an exact ID size, turn Lock Aspect Ratio off so the image fits the precise dimensions the form demands (after cropping in Step 1, distortion will be minimal).
Set the output format to JPG.
Click Resize Image and download.
Your image now matches the required dimensions exactly. Do the same for your signature using its own dimensions.
Step 3 - Reduce the file size to the KB limit
Now bring the file under the form's KB cap. Open the Image Compressor and:
Upload your resized photo (or signature).
Lower the quality slider - start around 70–80% and go lower if you need a smaller file.
Click Compress and check the resulting size shown in KB.
If it's still over the limit, compress again at a lower quality; if it came out far under, you can raise quality slightly for a sharper image.
Because signatures are simple black-on-white images, they compress to 10–20 KB very easily. Photos may need a little more adjustment to land inside a 20–50 KB window while staying clear.
That's the whole workflow: crop to frame → resize to exact pixels → compress to the KB limit. Three quick tools, and your upload goes through on the first try.
Practical tips to avoid a second rejection
Use a plain, light background for the photo - most exams require white or light grey.
Keep the signature on white paper with a black or blue pen, scanned or photographed in good light, then cropped tight.
Save as JPG, not PNG - PNG files are larger and many forms reject them.
Don't over-compress to the point the photo looks blocky; aim to sit comfortably inside the KB range, not at the rock bottom.
Recheck after each step - confirm dimensions after resizing and file size after compressing.
Frequently asked questions
How do I resize a photo for an online exam form?
First note the required dimensions and KB limit from the form. Resize the photo to the exact pixel size using an image resizer, then reduce its file size with a compressor until it fits the form's KB range. Save it as a JPG.
How can I reduce my photo to 50 KB (or 20 KB) for a form?
Resize the photo to the required dimensions first, then open a compressor and lower the quality slider until the file size shown drops under your target. Check the size, and compress again at lower quality if needed.
How do I resize a signature to 20 KB?
Crop the signature tightly, resize it to the required pixel dimensions (often around 140 × 60 px), set the format to JPG, then compress it. Signatures are simple images and usually reach 10–20 KB easily.
What is the standard photo size for exam forms in India?
It varies by exam, but a photograph is commonly around 200 × 230 px (about 3.5 × 4.5 cm) at 20–50 KB, and a signature is smaller. Always confirm the exact numbers in your form's instructions.
My form gives the size in cm but the tool uses pixels. What do I do?
Convert using pixels = cm ÷ 2.54 × DPI (use 300 DPI if the form doesn't say). For example, 3.5 × 4.5 cm at 300 DPI is about 413 × 531 px. Enter the pixel result in the resizer.
Are these tools safe for my personal photo and signature?
Yes. The resizer, cropper, and compressor all run entirely inside your browser using the Canvas API — your files are never uploaded to any server.
Get your upload right the first time: crop, resize to exact dimensions, then compress to the KB limit — all free, all in your browser.
Related Tools

Get new tools & guides
Occasional updates, no spam.